
Halloween desserts don’t need to look terrifying to steal the spotlight. Sometimes the cutest little ghost cookie or pumpkin-shaped treat can make the whole dessert table disappear faster than you can say, “Who ate the last one?”
These Halloween cookie recipes bring together buttery cookies, chocolate, colorful icing, sprinkles, and plenty of spooky-season personality. They work beautifully for Halloween parties, school treats, family baking afternoons, or those nights when you simply want an excuse to eat a cookie shaped like a bat. Honestly, nobody needs a better reason.
I’ve included a mix of easy decorated cookies and fun homemade treats, so you can choose based on how much time—and patience—you have. Some recipes need a little decorating practice, while others look adorable with almost zero artistic talent required. Win-win, right?
So grab your mixing bowl, preheat the oven, and prepare for 8 cute Halloween cookies that deserve a permanent spot on your October baking list.
1. Classic Halloween Sugar Cookies

If you want one recipe that gives you endless decorating possibilities, start here. These soft, buttery sugar cookies hold their shape nicely and make the perfect blank canvas for pumpkins, ghosts, bats, and whatever spooky creature you dream up.
Ingredients
- 2 ¾ cups all-purpose flour
- 1 cup unsalted butter, softened
- 1 cup granulated sugar
- 1 large egg
- 1 teaspoon vanilla extract
- ½ teaspoon baking powder
- ¼ teaspoon salt
- Orange, black, white, and green decorating icing
- Halloween sprinkles, optional
Step-by-Step Instructions
- Beat the softened butter and sugar until creamy and fluffy.
- Add the egg and vanilla extract, then mix until everything blends smoothly.
- Whisk the flour, baking powder, and salt in another bowl.
- Gradually add the dry ingredients to the butter mixture and mix until a soft dough forms.
- Wrap the dough and chill it for at least 30 minutes. Don’t skip this step unless you enjoy cookies that spread into mysterious blobs.
- Roll the dough on a lightly floured surface until it reaches about ¼-inch thickness.
- Cut the dough with Halloween cookie cutters.
- Place the shapes on a lined baking sheet.
- Bake at 350°F (175°C) for about 8–10 minutes, just until the edges turn lightly golden.
- Let the cookies cool completely before decorating.
- Pipe icing over pumpkins, ghosts, bats, or skulls and finish with sprinkles.
Why You’ll Love It
These cookies give you the freedom to make every batch look completely different. I especially love using orange and black icing because the classic Halloween colors instantly make even simple cookies look festive.
For softer cookies, avoid overbaking them. The centers should still look fairly pale when you pull them from the oven.
2. Spooky Chocolate Spider Cookies
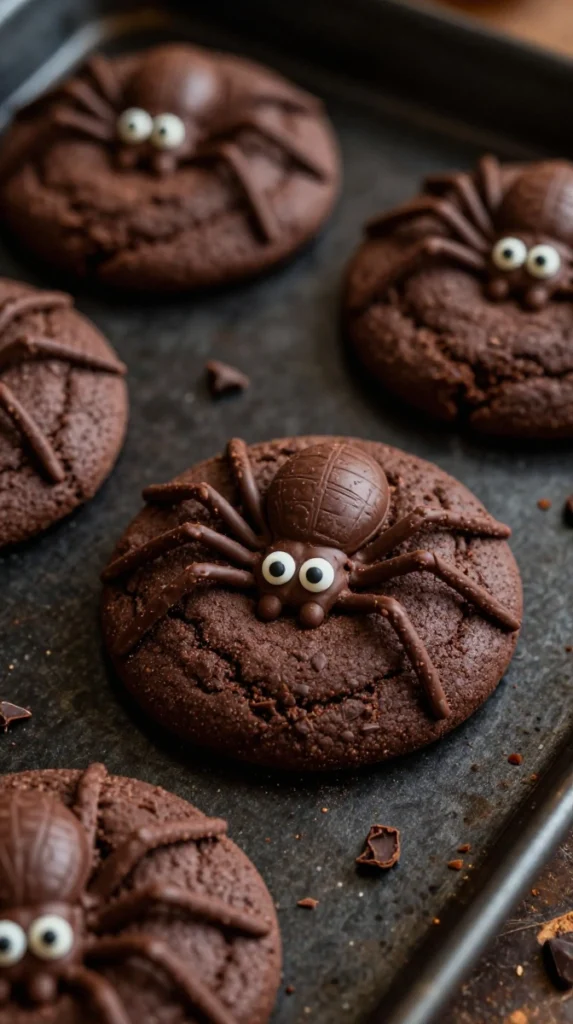
Chocolate lovers, this one has your name written all over it. These rich chocolate cookies get a creepy-cute makeover with chocolate candies and icing spider legs.
Ingredients
- 1 ¾ cups all-purpose flour
- ½ cup unsweetened cocoa powder
- ½ cup unsalted butter, softened
- ¾ cup granulated sugar
- ½ cup brown sugar
- 1 large egg
- 1 teaspoon vanilla extract
- ½ teaspoon baking soda
- ¼ teaspoon salt
- Chocolate candies for spider bodies
- Melted chocolate or black icing for spider legs
- Candy eyes
Step-by-Step Instructions
- Cream the butter, granulated sugar, and brown sugar until smooth.
- Beat in the egg and vanilla.
- Combine the flour, cocoa powder, baking soda, and salt in another bowl.
- Slowly mix the dry ingredients into the wet mixture.
- Chill the dough for about 30 minutes.
- Roll the dough into small balls and arrange them on a lined baking sheet.
- Bake at 350°F (175°C) for 9–11 minutes.
- Immediately press a chocolate candy into the center of each warm cookie.
- Let the cookies cool completely.
- Pipe eight tiny spider legs around each candy.
- Add two candy eyes to each spider.
Why You’ll Love It
These cookies look impressive without requiring serious decorating skills. The chocolate cookie tastes rich and slightly fudgy, while the candy center adds extra sweetness.
Quick tip: Add the chocolate candy while the cookie remains warm. The heat helps it stick without turning the whole thing into chocolate soup.
3. Adorable Ghost Meringue Cookies
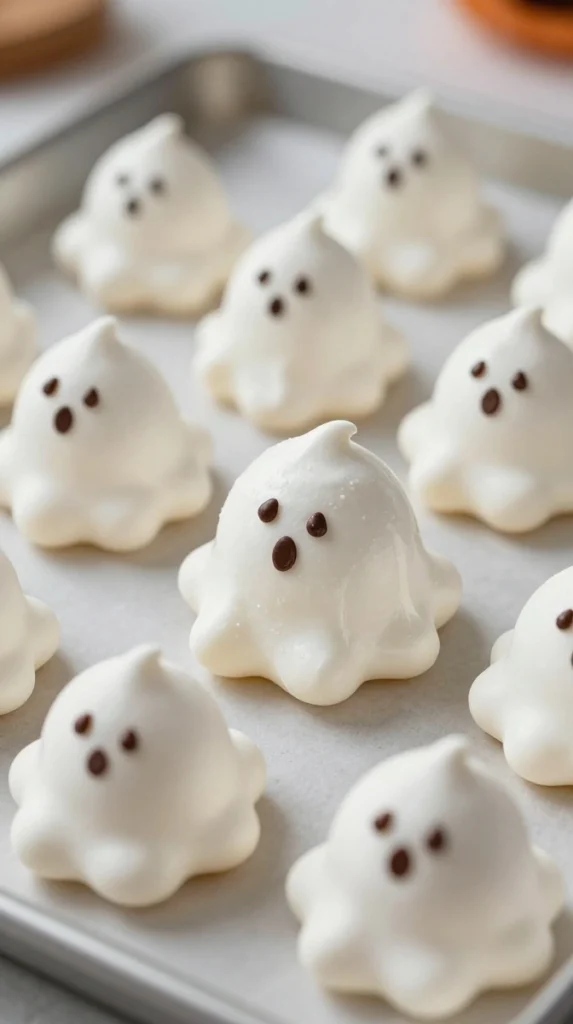
These little ghost cookies look like they wandered straight out of a friendly haunted house. They also make a great option when you want something lighter and crispier than traditional butter cookies.
Ingredients
- 3 large egg whites
- ¾ cup granulated sugar
- ½ teaspoon cream of tartar
- 1 teaspoon vanilla extract
- Pinch of salt
- Mini chocolate chips or black decorating gel for eyes
Step-by-Step Instructions
- Preheat the oven to 225°F (110°C).
- Beat the egg whites with cream of tartar and salt until foamy.
- Gradually add the sugar while continuing to beat.
- Keep mixing until the meringue becomes glossy and forms stiff peaks.
- Add vanilla and gently mix.
- Transfer the meringue into a piping bag.
- Pipe tall ghost shapes onto a parchment-lined baking sheet.
- Give each ghost a slightly wavy base for extra personality.
- Add tiny chocolate chips or gel dots for the eyes.
- Bake for about 90 minutes.
- Turn off the oven and let the ghosts cool inside for another hour.
Why You’ll Love It
These ghosts look ridiculously cute, especially when you pipe different sizes. I like making a few tiny ghosts alongside larger ones because they look like a whole little haunted family.
Keep them away from humidity because meringues can soften quickly. Nobody invited soggy ghosts to the party.
4. Pumpkin Spice Chocolate Chip Cookies
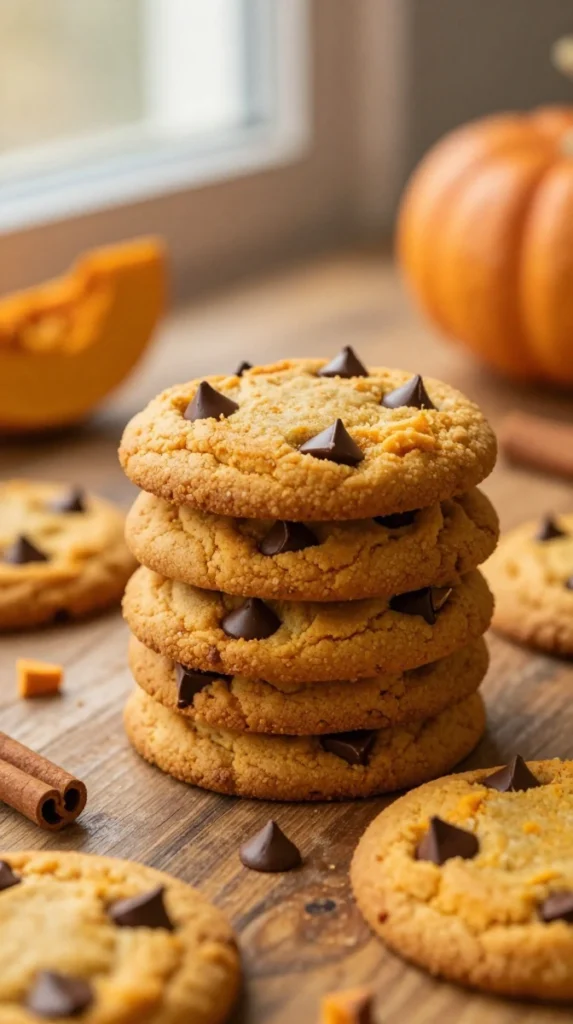
Pumpkin spice and Halloween belong together. These cookies combine warm pumpkin spices with chocolate chips for a soft, cozy treat that smells incredible while it bakes.
Ingredients
- 1 ¾ cups all-purpose flour
- ½ cup pumpkin puree
- ½ cup unsalted butter, softened
- ¾ cup brown sugar
- ¼ cup granulated sugar
- 1 large egg
- 1 teaspoon vanilla extract
- 1 teaspoon pumpkin pie spice
- ½ teaspoon baking soda
- ¼ teaspoon salt
- 1 cup chocolate chips
Step-by-Step Instructions
- Cream the butter and sugars until fluffy.
- Beat in the pumpkin puree, egg, and vanilla.
- Whisk together the flour, pumpkin pie spice, baking soda, and salt.
- Add the dry ingredients to the pumpkin mixture.
- Fold in the chocolate chips.
- Chill the dough for about 20–30 minutes.
- Scoop rounded tablespoons of dough onto a lined baking sheet.
- Bake at 350°F (175°C) for 10–12 minutes.
- Let the cookies cool on the baking sheet for several minutes.
- Transfer them to a cooling rack.
Why You’ll Love It
These cookies taste like autumn in every bite. The pumpkin keeps them soft, while the chocolate chips add little pockets of sweetness.
My favorite trick: Add a few extra chocolate chips to the tops before baking. It makes them look bakery-worthy with almost no extra effort.
5. Halloween Monster Eye Cookies

Want cookies that make kids immediately abandon every other dessert on the table? Make these monster cookies.
Bright candy eyes, colorful sprinkles, and a soft cookie base turn an ordinary batch into something wonderfully chaotic.
Ingredients
- 2 cups all-purpose flour
- ¾ cup unsalted butter, softened
- ¾ cup granulated sugar
- ½ cup brown sugar
- 1 large egg
- 1 teaspoon vanilla extract
- ½ teaspoon baking soda
- ¼ teaspoon salt
- 1 cup white or milk chocolate chips
- Candy eyes
- Halloween sprinkles
- Optional food coloring
Step-by-Step Instructions
- Beat the butter and sugars until creamy.
- Add the egg and vanilla and mix well.
- Combine flour, baking soda, and salt.
- Gradually mix the dry ingredients into the wet ingredients.
- Fold in the chocolate chips and sprinkles.
- Add a few drops of food coloring if you want colorful monster cookies.
- Scoop the dough onto a lined baking sheet.
- Bake at 350°F (175°C) for 9–11 minutes.
- Press candy eyes into the warm cookies.
- Let them cool completely before serving.
Why You’ll Love It
These are perfect when you want easy Halloween cookies without complicated decorating. You can use two eyes, five eyes, or an absolutely ridiculous number of eyes.
And yes, odd numbers somehow make them look even more like monsters. Don’t ask me why. Halloween has its own rules.
6. Black Cat Chocolate Sugar Cookies
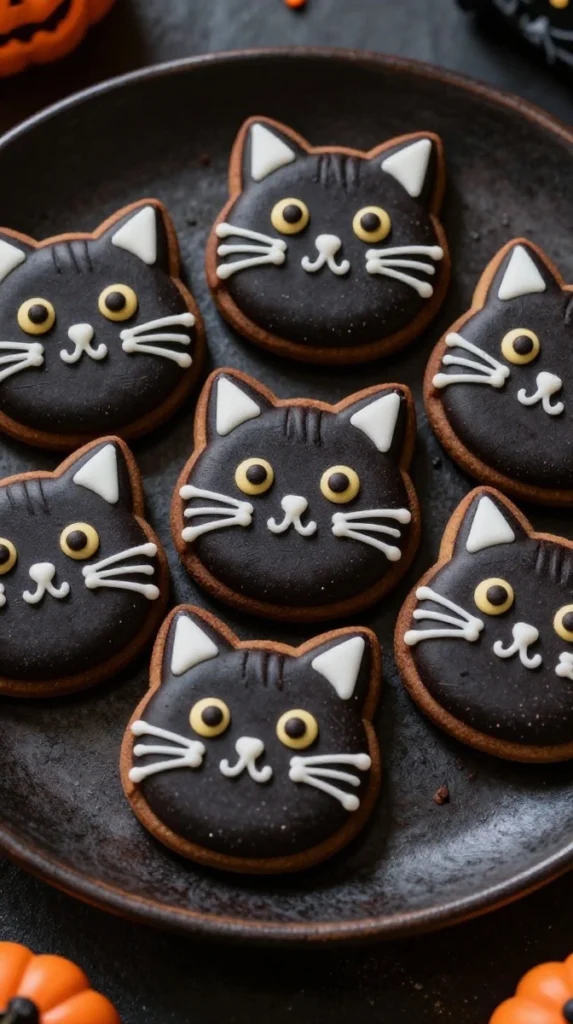
These black cat cookies bring just the right amount of spooky attitude to your dessert table. Their chocolate flavor pairs beautifully with vanilla icing, white chocolate, or even a simple dusting of powdered sugar.
Ingredients
- 2 cups all-purpose flour
- ½ cup cocoa powder
- ¾ cup unsalted butter, softened
- ¾ cup granulated sugar
- 1 large egg
- 1 teaspoon vanilla extract
- ½ teaspoon baking powder
- ¼ teaspoon salt
- White icing
- Pink or orange decorating icing
- Optional candy eyes
Step-by-Step Instructions
- Beat the butter and sugar until creamy.
- Add the egg and vanilla.
- Whisk the flour, cocoa powder, baking powder, and salt.
- Slowly incorporate the dry mixture into the wet ingredients.
- Chill the dough for 30 minutes.
- Roll the dough to about ¼-inch thickness.
- Cut out cat shapes with a cookie cutter.
- Place the shapes on a lined baking sheet.
- Bake at 350°F (175°C) for 8–10 minutes.
- Cool completely.
- Decorate the cats with tiny icing details for eyes, noses, whiskers, and ears.
Why You’ll Love It
These cookies look polished enough for a Halloween party but still feel homemade. If you don’t own a cat-shaped cookie cutter, use a simple round cutter and decorate the cookies as little cat faces.
IMO, the whiskers make them. They give each cookie a tiny bit of personality.
7. Halloween Oreo Spider Cookies
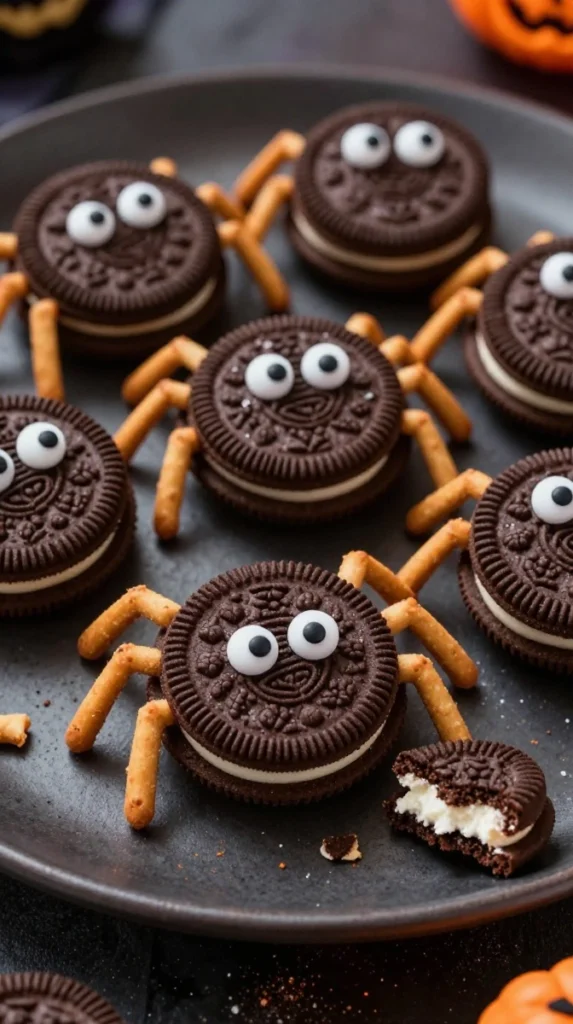
Need a Halloween dessert that barely requires baking? These Oreo spider cookies come to the rescue.
They’re crunchy, chocolatey, cute, and ridiculously easy to assemble. Kids can even help make them, which means you can finally delegate some of the kitchen work. 🙂
Ingredients
- 12 chocolate sandwich cookies
- 24 candy eyes
- Black or chocolate decorating icing
- Thin pretzel sticks
- Optional melted chocolate
Step-by-Step Instructions
- Carefully twist each sandwich cookie apart.
- Break pretzel sticks into small pieces.
- Place four pretzel pieces on each side of the cream layer.
- Press the cookie back together carefully.
- Add two small dots of icing to the top.
- Press candy eyes onto the icing.
- Let the icing set for several minutes.
- Arrange the spiders on a Halloween platter.
Why You’ll Love It
This recipe works beautifully when you need a quick Halloween cookie idea without turning on the oven. It also makes a fantastic activity for kids because they can build their own creepy-crawly creations.
For an extra chocolatey finish, drizzle the spiders with a little melted chocolate. Just don’t eat all the cookies while assembling them. That part gets surprisingly difficult.
8. Cute Halloween Sandwich Cookies

These colorful sandwich cookies look like tiny Halloween gifts. Two crisp cookies sandwich a creamy filling, while orange, purple, or black decorations give them their spooky-season personality.
Ingredients
- 2 cups all-purpose flour
- ¾ cup unsalted butter, softened
- ¾ cup granulated sugar
- 1 large egg
- 1 teaspoon vanilla extract
- ½ teaspoon baking powder
- ¼ teaspoon salt
- Buttercream or cream cheese frosting
- Orange, purple, black, or green food coloring
- Halloween sprinkles
Step-by-Step Instructions
- Cream the butter and sugar until smooth.
- Beat in the egg and vanilla.
- Mix the flour, baking powder, and salt separately.
- Gradually add the dry ingredients to the butter mixture.
- Chill the dough for 30 minutes.
- Roll the dough and cut small circles or Halloween shapes.
- Bake at 350°F (175°C) for 8–10 minutes.
- Cool the cookies completely.
- Divide the frosting into bowls and tint each one with Halloween colors.
- Spread frosting over the bottom of one cookie.
- Place another cookie on top and gently press.
- Roll the edges in Halloween sprinkles.
Why You’ll Love It
These cookies feel a little more special than regular cutout cookies because every bite includes a creamy center. You can also make several frosting colors and create a whole Halloween cookie collection from one dough.
FYI: Keep the frosting layer fairly thin. Too much filling makes sandwich cookies messy and harder to stack.
Easy Tips for Better Halloween Cookies
You don’t need a professional kitchen or a cabinet full of fancy baking equipment to make great Halloween cookies. A few simple tricks can make a surprisingly big difference.
Chill Cutout Cookie Dough
Cold dough keeps its shape better in the oven. If your kitchen runs warm, chill the cut cookies again for 10–15 minutes before baking.
Don’t Overbake
Halloween sugar cookies can go from soft to crunchy faster than expected. Pull them out when the edges look set and lightly golden.
Use Halloween Colors
You don’t need complicated designs. Orange, black, white, purple, and green instantly create a Halloween look.
Decorate After Cooling
Warm cookies can melt icing and make detailed decorations slide everywhere. Let them cool completely first.
Let Kids Decorate
Perfection isn’t the goal here. Let kids pile on the sprinkles, create weird monsters, and give ghosts questionable facial expressions. Those usually become the most memorable cookies anyway.
How to Store Halloween Cookies
Most homemade cookies taste best when you store them in an airtight container at room temperature.
For decorated cookies, place parchment paper between layers to protect the icing.
You can also freeze many uniced cookies for later. Wrap them tightly, place them in a freezer-safe container, and thaw them at room temperature before decorating.
If you’re preparing cookies for a Halloween party, making them one or two days ahead can save you from baking, decorating, cleaning the kitchen, and entertaining guests at the same time.
Because apparently Halloween parties require more than just putting candy in a bowl.
Fun Halloween Cookie Decorating Ideas
Want to turn simple cookies into something Pinterest-worthy? Try these easy ideas:
- Add candy eyes to almost anything.
- Use black icing to create spiderweb patterns.
- Pipe white icing onto chocolate cookies for ghost faces.
- Add orange sanding sugar to pumpkin cookies.
- Use crushed chocolate cookies as “dirt” around graveyard cookies.
- Add mini chocolate chips for tiny monster freckles.
- Use pretzel pieces as spider legs.
- Create colorful monster cookies with different numbers of eyes.
- Sprinkle cookies with edible glitter for a little extra Halloween sparkle.
You don’t need perfect piping skills. In fact, slightly messy decorations often make Halloween cookies look more handmade and charming.
Which Halloween Cookie Should You Make First?
If you want classic and versatile, go for the Halloween sugar cookies.
If chocolate has your heart, make the spider cookies or black cat cookies.
Need something fast? The Oreo spider cookies take the prize.
Want a kid-friendly project? The monster eye cookies are almost impossible to mess up.
And if you want that cozy autumn flavor, the pumpkin spice chocolate chip cookies deserve a spot in your oven.
Why choose just one, though? Halloween only comes once a year, and I fully support using that as an excuse to make several batches.
Final Thoughts
These 8 Halloween cookie recipes prove that spooky desserts can also be ridiculously cute. From buttery sugar cookies covered in colorful icing to creepy little spiders made from chocolate cookies, each recipe brings something fun to the Halloween table.
The best part? You don’t need advanced baking skills to make them look special. Keep the flavors simple, use bold Halloween colors, add plenty of candy eyes, and let your creativity take over.
So whether you’re planning a Halloween party, preparing treats for kids, or simply craving something sweet while watching a scary movie, grab your favorite cookie recipe and start baking.
Just remember to save a few for everyone else.
Or don’t. I won’t tell. 🎃🍪